

Elevate Your Entertaining: The Ultimate Homemade Cheese Spread Recipe
Unlock the secret to transforming leftover cheeses into a luxurious, flavorful, and incredibly versatile homemade dip with this sensational Cheese Spread Recipe! Whether you’re aiming to minimize food waste or simply crave a gourmet appetizer that comes together in minutes, this recipe delivers a rich medley of flavors. Infused with your favorite cheeses, a subtle hint of dry white wine, creamy butter, and vibrant fresh herbs, you can effortlessly create a delicious cheese spread that will impress every palate.


From My Kitchen to Yours: Sommer’s Culinary Philosophy
Having lived in the vibrant mountain town of Asheville, North Carolina for many years, I’ve grown to appreciate its unique blend of cultures and its strong community passion for conservation. This ethos deeply influences my cooking, inspiring me to find creative and delicious ways to reduce waste in the kitchen. This Homemade Cheese Spread isn’t just a recipe; it’s a testament to turning everyday leftovers into something extraordinary, aligning perfectly with a mindful, sustainable approach to food.
Why You’ll Adore This Easy Cheese Spread
- Unbeatable Versatility: This isn’t merely a dip; it’s a culinary chameleon! Spread it on crackers, slather it in sandwiches, use it as a flavorful filling for wraps, or even as a creamy base for appetizers. Its adaptability makes it perfect for any occasion, from casual snacks to elegant party spreads.
- Your Zero-Waste Kitchen Hero: Say goodbye to discarding those small, forgotten cheese ends in your refrigerator! This recipe offers a brilliant and delicious solution, transforming a collection of diverse cheeses into a harmonious, new creation. It’s an environmentally conscious choice that also saves you money and expands your culinary repertoire.
- Creamy, Flavorful Perfection: Prepare your taste buds for a delightful experience. This homemade cheese spread boasts a lusciously smooth texture, rich with the nuanced flavors of your chosen cheeses, brightened by a whisper of white wine, and uplifted by the aromatic freshness of garden herbs. It’s a truly satisfying blend that’s far superior to any store-bought alternative.
- Effortless & Accessible: You’ll be amazed at how quickly this gourmet-quality spread comes together. Utilizing simple, readily available ingredients that you likely already have on hand, this recipe proves that sophisticated flavors don’t require complicated steps or exotic components.
Embrace the simplicity and deliciousness of this garlic and herb cheese spread, crafted from ingredients that are probably already in your pantry!

Essential Ingredients for Your Perfect Cheese Spread
Creating an outstanding cheese spread starts with understanding the role of each ingredient. Here’s a detailed look at what you’ll need and some tips for best results:
- Cheese: The Heart of the Spread
- Any Variety Welcome: This is where the magic of “leftover” truly shines. Don’t be shy about combining different types of cheese – cheddar, Swiss, provolone, Monterey Jack, gruyere, or even a touch of smoked gouda. The blend creates a complex flavor profile.
- Room Temperature is Key: Ensure your cheeses are at room temperature. This allows them to blend smoothly and incorporate evenly, preventing a lumpy or uneven texture. Cold cheese won’t emulsify properly with the other ingredients.
- Preparation: For harder cheeses, always remove any rinds. Cut all cheeses into small, uniform cubes (about 1/2-inch) to ensure they process easily and consistently in your food processor.
- Dry White Wine: The Flavor Enhancer
- Why Dry? A dry white wine, such as Sauvignon Blanc, Pinot Grigio, or an un-oaked Chardonnay, adds a subtle acidity and brightness that cuts through the richness of the cheese. It also helps to achieve a smooth, creamy consistency.
- Avoid Sweet Wines: Sweet wines will clash with the savory profile of the cheese.
- Non-Alcoholic Alternative: If you prefer to omit alcohol, a splash of vegetable broth or even a tiny amount of apple cider vinegar (start with 1/2 teaspoon and adjust) can provide a similar liquid and acidic element, though the flavor will be different.
- Unsalted Butter: For Unrivaled Creaminess
- Softened: Like the cheese, softened butter is crucial for a smooth blend. It helps bind the ingredients and contributes to the spread’s luxurious texture.
- Unsalted Preference: Using unsalted butter allows you to control the overall saltiness of your spread, especially since different cheeses vary significantly in sodium content. You can always add salt to taste later.
- Fresh Herbs: The Aromatic Soul
- Vibrant and Essential: Fresh herbs are non-negotiable for this recipe. They impart a fresh, lively flavor that dried herbs simply can’t replicate.
- Your Choice: Parsley (flat-leaf or curly), basil, thyme, or rosemary are all excellent choices. You can use one herb exclusively or create a custom blend. For a Mediterranean twist, consider oregano or marjoram.
- Preparation: Finely chop your herbs before adding them to the food processor to ensure they distribute evenly throughout the spread.
- Fresh Garlic: The Pungent Perfection
- Fresh is Best: Always opt for fresh minced garlic over garlic powder. Fresh garlic provides a potent, vibrant flavor that is central to this spread’s appeal.
- Mincing Tips: For best results, mince your garlic very finely or use a garlic press. This ensures the garlic flavor is well integrated without any harsh, raw bites.
Crafting Your Signature Cheese Spread: Delicious Variations
One of the joys of making homemade cheese spread is the ability to customize it to your exact preferences. Here are some fantastic variations to inspire you:
- Savory & Smoky Delights:
- Bacon Bliss: Stir in some crispy, crumbled bacon bits for a smoky, salty, and utterly irresistible addition.
- Caramelized Onions: Sautéed onions, slowly caramelized to a deep golden brown, add a sweet and savory depth that pairs wonderfully with cheese.
- Sun-Dried Tomatoes: Finely chopped sun-dried tomatoes (oil-packed, drained) bring a concentrated, sweet-tart Mediterranean flavor.
- A Touch of Heat:
- Red Pepper Flakes: For a subtle warmth, mix in a dash of red pepper flakes. Start with a small amount and add more to taste.
- Jalapeño Kick: Finely minced fresh or pickled jalapeños (seeds removed for less heat) will give your spread a noticeable spicy kick.
- Hot Sauce Swirl: A few drops of your favorite hot sauce can be blended in for an extra layer of flavor and heat.
- Textural Innovations:
- Nutty Crunch: Add a spoonful of finely chopped nuts like walnuts, pecans, or hazelnuts for a delightful textural contrast and earthy flavor.
- Roasted Red Peppers: Chopped roasted red peppers (from a jar, drained) provide a sweet, smoky flavor and soft texture.
- Briny Olives: A few finely chopped black or green olives can introduce a wonderful briny, salty note.
- Sweet & Unexpected Pairings:
- Honey Drizzle: A light drizzle of honey or maple syrup can introduce a subtle sweetness that beautifully complements salty cheeses, creating a sophisticated balance.
- Fruit Preserves: For a truly gourmet experience, swirl in a teaspoon of fig jam, apricot preserves, or quince paste after blending.
- Dietary Considerations (for serving): While the spread itself is dairy-based, you can easily cater to various dietary needs with your serving choices:
- Gluten-Free: Serve with an array of gluten-free crackers, rice cakes, or fresh vegetable sticks.
- Low-Carb/Keto: Offer with cucumber slices, bell pepper strips, celery sticks, or my popular almond flour crackers recipe for a perfect pairing.

How To Make This Irresistible Homemade Cheese Spread
Making this cheese spread is incredibly simple, relying on the power of your food processor to do most of the work. Follow these steps for a perfectly smooth and flavorful result:
Essential Equipment: Your Food Processor
A food processor is indispensable for achieving the silky-smooth consistency of this cheese spread. Its powerful blades quickly break down the cheese and other ingredients, emulsifying them into a homogeneous mixture. While a blender might work for some, a food processor is generally preferred for its wider base and stronger torque, making it ideal for thicker preparations like this. Ensure your food processor is clean and ready before you begin.
Step-by-Step Instructions:
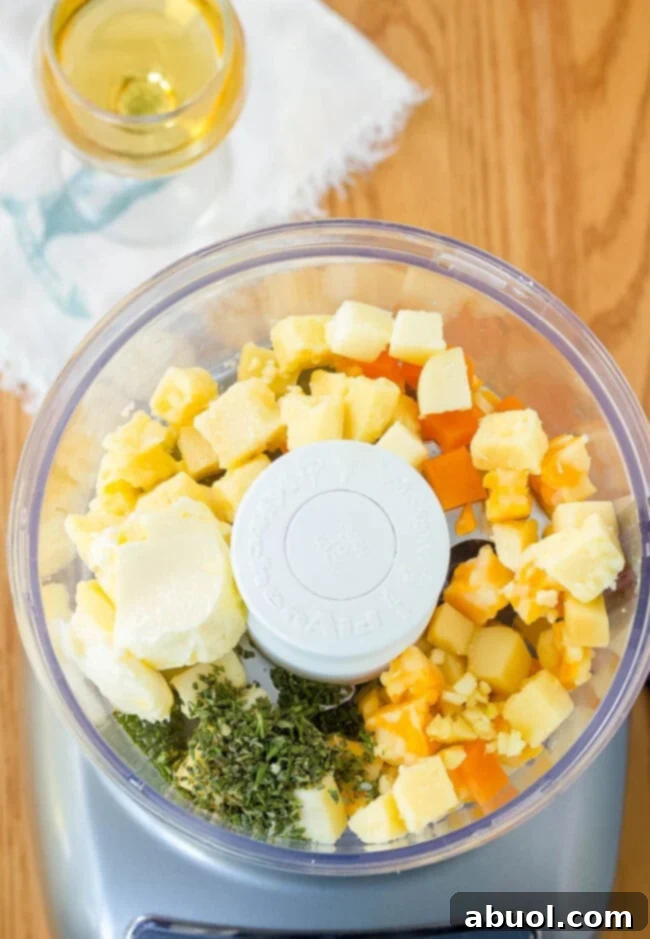
- Prepare Your Cheese: Begin by removing any hard rinds from your chosen cheeses. It’s crucial to cut all cheeses into approximately 1/2-inch cubes. This uniform sizing ensures that the cheese processes evenly, preventing larger chunks from remaining unblended.
- Combine and Process: Place the cubed cheese, dry white wine, softened unsalted butter, freshly chopped herbs (parsley, basil, thyme, or rosemary), and minced garlic into the bowl of your food processor. Secure the lid and process until the mixture is completely smooth and creamy. This typically takes about 2 minutes. You may need to stop the food processor once or twice to scrape down the sides with a spatula, ensuring all ingredients are thoroughly incorporated. The consistency should be spreadable, similar to a thick dip.
- Chill and Serve: You can serve the cheese spread immediately for a slightly softer consistency. However, for a firmer, more scoopable dip, transfer it to an airtight container and refrigerate for at least one hour. Chilling allows the flavors to meld beautifully and the spread to firm up.
Pro Tip: Don’t Skip the Fresh Herbs!
Seriously, this is a game-changer! The fresh herbs in this recipe are what truly bring this cheese spread to life. They infuse a bright, complex, and utterly irresistible flavor that simply cannot be replicated with dried herbs. The vibrant, aromatic notes of fresh parsley, basil, thyme, or rosemary will lift the entire flavor profile, adding a depth and freshness you wouldn’t otherwise achieve. Be generous with them – they are the secret to this spread’s unforgettable taste!
Storage and Make-Ahead Tips
This homemade cheese spread is fantastic for making ahead, making it an ideal choice for party preparation or meal planning. Proper storage ensures it remains fresh and delicious:
- Storing Leftovers: Once prepared, transfer the cheese spread to an airtight container. It will keep beautifully in the refrigerator for up to one week. The flavors often deepen and improve after a day or two, making it an excellent make-ahead appetizer.
- Serving After Refrigeration: If you’ve refrigerated the spread, it will be firmer. For optimal spreadability, remove it from the refrigerator about 20-30 minutes before serving. This allows it to soften slightly, making it easier to enjoy.
- Freezing: Freezing is generally not recommended for this type of cheese spread. The texture of dairy products can change significantly upon freezing and thawing, often becoming grainy or separating. It’s best enjoyed fresh or within its refrigerated shelf life.
Delightful Serving Suggestions
The versatility of this easy Homemade Cheese Spread recipe makes it perfect for a myriad of occasions, from casual afternoon snacks to elegant parties. Here are some creative ways to serve and savor this delectable creation:
- Classic Appetizer:
- With Crackers: Serve alongside an assortment of your favorite crackers – buttery, crispy, whole grain, or seeded.
- Veggie Platter: Pair with a vibrant platter of fresh, crisp vegetables such as cucumber slices, carrot sticks, celery stalks, bell pepper strips, cherry tomatoes, and broccoli florets.
- Artisan Bread: Offer with slices of crusty baguette, sourdough, or toasted pita bread.
- Elevated Everyday Meals:
- Sandwiches & Wraps: Spread a generous layer inside your favorite sandwiches or wraps for an extra burst of flavor and creaminess. It’s particularly good with turkey, ham, or roasted vegetables.
- Bagels & Toast: Use it as a savory topping for toasted bagels or a thick slice of rustic toast for a gourmet breakfast or brunch.
- Stuffed Vegetables: Fill hollowed-out mini bell peppers, celery sticks, or even mushroom caps with the spread for a sophisticated bite-sized appetizer.
- Breakfast Enhancer: Stir a spoonful into scrambled eggs or spread it on an omelet for a rich, herbaceous boost.
- Specialty Pairings:
- Keto & Gluten-Free Options: For those following specific diets, serve this cheese spread with crisp lettuce cups, slices of radish, or try my fantastic almond flour crackers recipe.
- Wine Pairing: Complement your cheese spread with a glass of the same dry white wine used in the recipe, or a light-bodied red wine that won’t overpower the delicate flavors.

Frequently Asked Questions About Homemade Cheese Spread
Absolutely! This cheese spread is an excellent make-ahead option. You can prepare it a few hours or even a day in advance. Simply store it in an airtight container in the refrigerator. For the best consistency and flavor, remember to remove it from the fridge about 20-30 minutes before you plan to serve it, allowing it to soften slightly.
If your cheese spread is too thick after blending, you can easily thin it out by adding a little extra white wine (or vegetable broth/water if omitting alcohol), one teaspoon at a time, until you reach your desired consistency. If it’s too thin, try adding a few more cubes of hard cheese (at room temperature) and process again to thicken it. Chilling also helps to firm up a slightly thinner spread.
While you can use pre-shredded cheese in a pinch, I highly recommend grating your own cheese from blocks. Pre-shredded cheeses often contain anti-caking agents like cellulose or potato starch, which can affect the texture and melt of your spread, making it less smooth and creamy. Freshly grated cheese will always yield superior results.
Any standard food processor with a strong motor should work well. A full-sized food processor (8-12 cups capacity) is ideal, as it provides enough space for the ingredients to circulate and blend smoothly. If you have a smaller mini-chopper, you might need to process the ingredients in batches.
Yes, you can! If you prefer not to use wine, you can substitute it with an equal amount of good quality vegetable broth for a savory note, or even a small splash of apple cider vinegar mixed with water to provide the necessary liquid and acidity. The flavor profile will be slightly different, but still delicious.
Flavor adjustment is easy! Before chilling, taste a small spoonful. You can add a pinch more salt (if using unsalted butter and mild cheeses), a grind of black pepper, a touch more minced garlic for pungency, or additional fresh herbs to brighten the flavor. Experiment with different herb combinations for unique twists!

The Complete Homemade Cheese Spread Recipe
This effortless Homemade Cheese Spread recipe transforms any leftover cheeses into a rich, creamy, and flavorful dip or spread. Perfect for appetizers, snacks, or elevating your meals, it’s a versatile solution for reducing food waste while delighting your taste buds.
- Yields: 1 cup
- Prep Time: 5 minutes
- Total Time: 5 minutes
- Course: Appetizer, Dip, Snack
- Cuisine: American
- Author: Sommer Collier
Ingredients
- 1/2 pound leftover cheese, any variety, at room temperature (cheddar, Swiss, provolone, Monterey Jack, etc.)
- 1/8 cup dry white wine (e.g., Sauvignon Blanc, Pinot Grigio)
- 2 tablespoons unsalted butter, softened
- 1 tablespoon fresh herbs, finely chopped (parsley, basil, thyme, or rosemary)
- 1/2 teaspoon fresh minced garlic
Instructions
- Prepare Cheese: Remove any rinds from hard cheeses. Cut all cheeses into approximately 1/2-inch cubes. Ensure all cheese is at room temperature for best blending.
- Blend Ingredients: Place the cubed cheese, dry white wine, softened unsalted butter, finely chopped fresh herbs, and minced garlic into the bowl of a food processor. Process until the mixture is completely smooth and creamy, which should take about 2 minutes. Stop and scrape down the sides of the bowl as needed to ensure all ingredients are well incorporated.
- Serve or Chill: Serve the cheese spread immediately for a softer consistency, or transfer it to an airtight container and refrigerate for at least one hour to allow it to firm up and for the flavors to meld.
Nutrition Information (Approximate per 4oz serving)
Serving: 4 ounces, Calories: 1143kcal, Carbohydrates: 4g, Protein: 56g, Fat: 97g, Saturated Fat: 62g, Cholesterol: 298mg, Sodium: 1415mg, Potassium: 222mg, Sugar: 1g, Vitamin A: 3310IU, Vitamin C: 5.4mg, Calcium: 1635mg, Iron: 1.8mg

Explore More Irresistible Dip Recipes!
If you loved this homemade cheese spread, you’ll surely enjoy these other fantastic dip recipes:
This Homemade Cheese Spread is more than just a recipe; it’s an invitation to savor simple, fresh ingredients and reduce waste in your kitchen. With its effortless preparation and customizable flavors, you’ll find yourself reaching for this recipe again and again. Whether gracing your holiday table or elevating a weeknight snack, this creamy, herbaceous spread promises to deliver delightful moments. Don’t let those cheese scraps go to waste—transform them into a culinary masterpiece today!