

Transform your dessert game with these irresistible Chocolate Dipped Ice Cream Cones! A beloved treat by both kids and adults, these homemade waffle cones coated in a crisp chocolate shell and loaded with your favorite toppings are the ultimate personalized sweet indulgence for any warm day or celebratory occasion. Get ready to create memorable moments, one delicious cone at a time.

Why Homemade Chocolate Dipped Ice Cream Cones Are a Must-Try
There’s a special kind of magic in a chocolate-dipped ice cream cone. Whether it’s the nostalgic crunch reminiscent of your favorite drive-through treat or the pure joy of biting into that instantly hardening chocolate shell, it’s an experience that transcends a simple dessert. We all harbor a deep-seated love for those classic ice cream drumsticks and the iconic chocolate-dipped cones from our childhood.
But what if we told you that creating these delightful confections at home is not only incredibly easy but also far more rewarding? Homemade Hand Dipped Chocolate Ice Cream Cones offer unmatched customization and a fun, interactive activity for the whole family. Forget the hassle of store-bought versions; making your own allows you to control the quality of ingredients, experiment with flavors, and build the perfect sweet treat tailored to your cravings.
This simple recipe is designed to make any ordinary day feel extraordinary. With just a few pantry staples, your choice of ice cream, and an innovative chocolate coating that sets in seconds, you’re on your way to dessert perfection. And here’s a little secret trick that makes the process infinitely smoother: an ordinary egg carton becomes your best friend, acting as a convenient stand for dipping and drying!

The Secret to the Perfect Chocolate Shell: Ingredients Explained
Achieving that signature crisp, fast-hardening chocolate coating is simpler than you might think. Our recipe relies on just a few key ingredients to deliver a flawless finish every time. Here’s what you’ll need to gather:
- Chocolate Chips: The star of our show! You have the freedom to choose your favorite type – semi-sweet for a classic balance, rich dark chocolate for an intense flavor, or creamy milk chocolate for a sweeter profile. The quality of your chocolate will significantly impact the final taste, so opt for good quality chips.
- Coconut Oil: This is the secret ingredient responsible for the quick-setting, crunchy chocolate shell. Coconut oil has a lower melting point than chocolate and solidifies rapidly when it comes into contact with cold ice cream. Refined coconut oil is recommended as it has a neutral flavor, ensuring your chocolate flavor remains untainted.
- Salt: A tiny pinch of salt might seem counterintuitive in a sweet treat, but it’s a game-changer. It balances the sweetness of the chocolate ganache and enhances all the other flavors, making each bite even more satisfying.
- Your Favorite Ice Cream: The canvas for your chocolate masterpiece! Don’t limit yourself to just one flavor. Offer a variety of popular choices like classic vanilla, indulgent chocolate, refreshing mint, nutty peanut butter, adventurous rocky road, fruity blueberry pie, delicate pistachio, or even gourmet lavender dark chocolate chip. The colder and firmer the ice cream, the better it will hold up during dipping.
- Waffle Cones: These provide the perfect crunchy base for your dipped treats. Waffle cones offer a delightful texture and a wider opening, making them ideal for holding plenty of ice cream and toppings. Feel free to use any size you like!
And, of course, a dazzling array of toppings – because no dipped cone is complete without them!
Crafting Your Own Chocolate Dipped Ice Cream Cones: A Step-by-Step Guide
Making these gourmet-style ice cream cones at home is surprisingly simple and incredibly fun. Follow these easy steps to create your perfect personalized frozen treats:
- Prepare Your Cone Stand: This is where our clever egg carton trick comes in! Take an empty egg carton and cut holes into the top lid, large enough for the ice cream cones to sit upright and securely. This DIY stand will be invaluable for holding your cones during preparation and freezing. You’ll thank us later!
- Scoop and Secure Your Ice Cream: Begin by scooping your chosen ice cream flavors onto the waffle cones. Use a spoon to gently but firmly press the ice cream down, ensuring it fills the cone and creates a stable, rounded top. The goal is to make sure the ice cream is well-integrated with the cone. Once scooped, immediately place the cones upright in your prepared egg carton stand and transfer them to the freezer. They need to freeze solid for at least an hour (or even better, several hours or overnight) so that the ice cream and cone stick together firmly, preventing premature melting during the dipping process. If you’re making these with children, preparing the cones ahead of time makes the dipping phase much smoother.
- Create the Perfect Chocolate Coating: While your ice cream cones are firming up in the freezer, it’s time to prepare the star – your chocolate ganache coating. Combine the chocolate chips, coconut oil, and a pinch of salt in a microwave-safe bowl. Heat in the microwave in 30-second intervals, stirring well after each, until the chocolate is completely melted and smooth. Alternatively, you can use a double boiler on the stovetop for a more controlled melt. Once melted, allow the chocolate coating to cool slightly for about 10 minutes. It should still be liquid but not piping hot, which helps prevent the ice cream from melting too quickly upon contact.
- Dip, Top, and Freeze: Now for the most exciting part! Arrange all your chosen toppings in small, separate bowls. Working one cone at a time, take a solidly frozen ice cream cone from the freezer. Dip the top of the ice cream and cone into the slightly cooled chocolate coating. Swirl it gently to ensure an even coating, then lift and allow any excess chocolate to drip off. IMMEDIATELY, while the chocolate ganache is still wet and pliable, sprinkle on your desired toppings. The cold ice cream will cause the chocolate to harden almost instantly. Once topped, place the ice cream cone upright back into your egg carton stand. Repeat with the remaining cones.
- Final Freeze and Serve: Once all your cones are dipped and topped, place the egg carton stand back into the freezer. Freeze the cones for at least 30 minutes, or until the chocolate coating is completely firm. You can eat them immediately, or store them in the freezer for later enjoyment. For longer storage, you can neatly wrap each individual ice cream drumstick in parchment paper before placing them back in the carton and freezing.
Find the Full, Detailed (and Printable!) Chocolate Dipped Ice Cream Cones Recipe Below. Enjoy Your Delicious Creations!
Unleash Your Creativity: Recipe Variations for Every Palate
The beauty of homemade treats lies in their adaptability. Don’t be afraid to experiment with these chocolate dipped ice cream cones to suit different tastes and dietary needs:
- Dairy-Free Delight: Easily make these cones dairy-free by opting for your favorite nondairy ice cream (often called “nice cream”) and using plant-based chocolate chips or dark chocolate that is naturally dairy-free to create your ganache.
- Sugar-Free Sweetness: For those managing sugar intake, use preferred sugar-free chocolate chips, sugar-free ice cream, and sugar-free cones. Always check labels to ensure they meet your dietary requirements.
- Ganache Glamour: While our basic chocolate chip and coconut oil ganache is fantastic, feel free to get creative! This simple melting method works wonderfully with various types of meltable chips. Consider white chocolate, peanut butter chips, butterscotch chips, or even adding a few drops of food-grade extracts (like almond or peppermint) to a plain chocolate ganache for an extra flavor kick.
- Cone Customization: If you’re a true chocolate enthusiast, double down on the indulgence by using pre-chocolate-dipped WAFFLE CONES! You can often find these in specialty stores. For those with gluten sensitivities, this recipe is easily made gluten-free by simply substituting with your favorite GF-friendly cones.
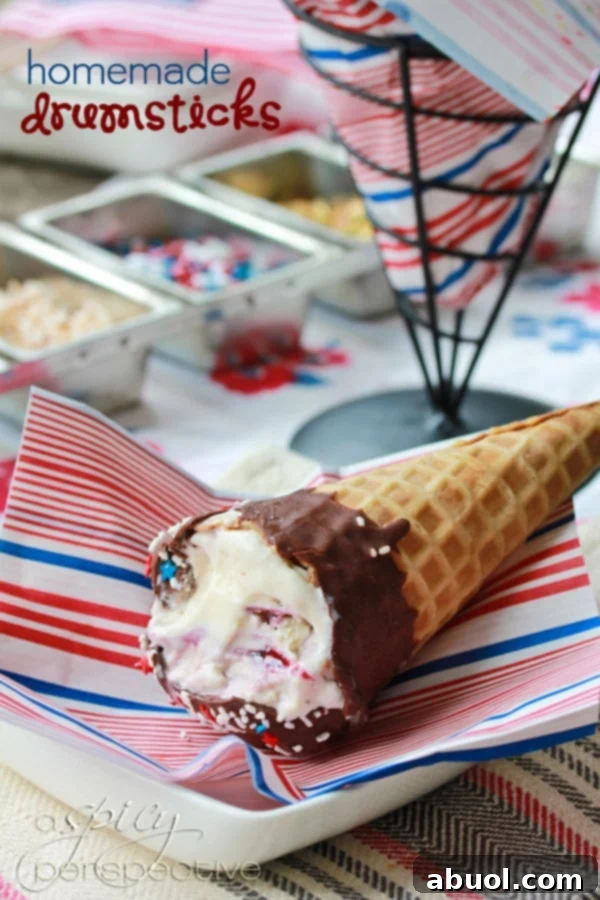
An Abundance of Awesomeness: The Best Toppings for Dipped Cones
Here’s where the fun truly begins! The right toppings elevate your chocolate-dipped ice cream cones from delicious to truly unforgettable. Provide a wide assortment and let everyone unleash their inner dessert artist:
- Classic Sprinkles: Also known as jimmies, these are a timeless choice. Offer a variety of shapes and colors, from rainbow to festive seasonal mixes. They add both visual appeal and a delightful crunch.
- Shredded Coconut: Raw for a subtle chewiness or toasted for an extra layer of nutty flavor and aroma.
- Crunchy Chopped Nuts: A fantastic way to add texture and richness. Peanuts, almonds, pecans, walnuts, pistachios, or hazelnuts are all excellent choices. Lightly toast them for even more flavor.
- Cereal Surprises: For an unexpected and playful crunch, try crushed crispy rice cereal, cinnamon crunch squares, or even colorful lucky charms.
- Crushed Cookies & Biscuits: The possibilities are endless! Think crushed Oreos or other sandwich creme cookies, graham crackers, chocolate chip cookies, or even shortbread.
- Chewy Dried Fruit: Add a burst of natural sweetness and chewiness with chopped dried cherries, cranberries, apricots, or strawberries.
- Mini Candies & Chocolate Bits: Small M&M’s, Reese’s Pieces, mini chocolate chips, toffee bits, or even pop rocks for a fizzy surprise!
- Unique Additions: Consider pretzel bits for a salty-sweet contrast, mini marshmallows, or even a drizzle of caramel or white chocolate before the shell fully hardens.
Frequently Asked Questions About Dipped Cones
The primary key to preventing your ice cream from melting during the dipping process is ensuring it is frozen solid beforehand. When the freezing cold ice cream comes into contact with the slightly cooled chocolate ganache, the coconut oil in the mixture causes the chocolate to harden almost instantly, creating a protective shell before the ice cream has a chance to significantly soften. Working quickly also helps!
If your chocolate coating starts to thicken or harden as you’re dipping the cones, don’t worry! Simply give the bowl a quick 5-10 second burst in the microwave, then stir thoroughly. This will re-melt the chocolate to its ideal dipping consistency without overheating it. You can repeat this as needed during your dipping session.
Absolutely! These ice cream cones are perfect for making in advance. After dipping and topping them, place them back into your egg carton stand and return them to the freezer until you’re ready to serve. For longer storage or to make them easier to handle at a party, you can wrap each individual cone neatly in parchment paper or plastic wrap before freezing. They’ll stay fresh and delicious for several days, ready to be pulled out for an instant treat!
Craving More Frozen Delights? Explore These Other Delicious Treats:
- Ginger Ice Cream with Grilled Peaches
- Mango Lassi Homemade Popsicles
- Vodka Gummy Bears Popsicles
- Buster Bar Ice Cream Cake
- Classic Vanilla Ice Cream Recipe
- Traditional Indian Ice Cream (Kulfi)
- No-Churn Banana Pudding Ice Cream
- Healthy 5-Minute Strawberry Pineapple Sherbet
- Homemade Pineapple Orange Creamsicle
- Refreshing Mango Italian Ice
- Easy Jello Popsicles
- Bubble Gum Ice Cream
- Creamy Fresh Pineapple Milkshakes
Chocolate Dipped Ice Cream Cones

Print Recipe
5 stars (2 reviews)
Leave a Review »
Hand-Dipped Chocolate Ice Cream Cones are a winner with kids and adults alike! Everyone loves waffle cones dipped in melted chocolate, then loaded with ice cream toppings for a personalized sweet treat!
Prep Time: 10 minutes
Cook Time: 2 minutes
Total Time: 12 minutes
Servings: 20 cones
Ingredients
- 1 1/2 pounds chocolate chips (semisweet or dark)
- 3/4 cup coconut oil
- 2 pinches salt
- 1 1/2 gallons ice cream (3 half-gallon containers in various flavors)
- 20 waffle cones
- Various Toppings: sprinkles, chopped nuts, cereal, toffee bits, small candy, shredded coconut, dried fruits
Instructions
- Punch holes in the top of 3 egg cartons to make ice cream cone stands.
- Scoop the ice cream and press firmly on top of each cone. Place in the stand and move to the freezer to harden, for at least 1 hour.
- Place the chocolate, coconut oil, and salt in a large bowl. Microwave for 60 seconds and stir. Return to the microwave for another 30 seconds and stir. Repeat until chocolate is smooth. Allow the chocolate coating to cool for 10 minutes.
- Set out the toppings. Then dip the ice cream cones in the chocolate coating and swirl around. Allow the excess chocolate drip off, then QUICKLY sprinkle the tops before they harden.
- Return to the freezer until ready to serve.
Nutrition Facts (per 1 cone serving)
- Calories: 867kcal
- Carbohydrates: 99g
- Protein: 12g
- Fat: 48g
- Saturated Fat: 31g
- Polyunsaturated Fat: 2g
- Monounsaturated Fat: 9g
- Trans Fat: 0.1g
- Cholesterol: 130mg
- Sodium: 319mg
- Potassium: 579mg
- Fiber: 3g
- Sugar: 84g
- Vitamin A: 1271IU
- Vitamin C: 2mg
- Calcium: 407mg
- Iron: 1mg
Course: Dessert, Snack
Cuisine: American
Author: Sommer Collier
Cook It? Love It? Rate It!
YOU can help this recipe RANK on Google – TAP 5 STARS so other hungry people can find it. Thank you!