
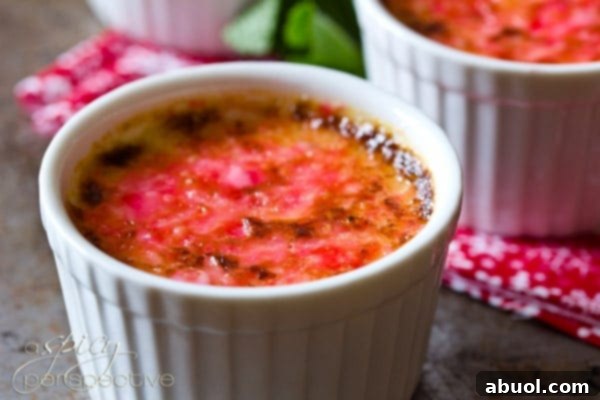
The holiday season brings with it a symphony of delightful flavors, and two of my absolute favorites are the refreshing zing of peppermint and the luxurious embrace of an ultra-creamy creme brulee. Imagine combining these two festive sensations into one unforgettable dessert! This easy peppermint creme brulee recipe, crowned with a vibrant candy cane topping, is precisely what you need to infuse your home with holiday cheer and impress your guests with minimal effort.
The Irresistible Allure of Christmas Creme Brulee
My culinary journey with creme brulee began nearly two decades ago, on a memorable date with my now-husband. He introduced me to this exquisite dessert at what we then considered the epitome of elegant steakhouses. After an extravagant meal, he declared, “I don’t care how full we are, we *have* to order the creme brulee here.” Having never encountered this dessert before, his enthusiasm sparked an intense curiosity within me.
When the delicate ramekin arrived, he looked at me with a mischievous twinkle and said, “Watch this.” With a gentle tap, the perfectly caramelized sugar crust shattered, revealing a silken, vanilla-infused custard beneath. It was a revelation – a symphony of textures and flavors that captivated me instantly. In that moment, I realized I was deeply in love… with creme brulee. And, quite possibly, with the man who introduced me to such a glorious little treat.
This Christmas Creme Brulee recipe pays homage to that cherished memory, blending my all-time favorite creme brulee base with the quintessential holiday flavor: peppermint. It’s a dessert crafted with love, designed to bring joy and a touch of magic to your festive gatherings. What makes this recipe truly exceptional for holiday entertaining is its remarkable simplicity and versatility. It’s incredibly easy to prepare, can be made several days in advance, and presents with an understated elegance that belies its straightforward creation. The subtle yet distinct peppermint flavor, enhanced by a hint of vanilla, makes it a festive showstopper.
We elevate this traditional French dessert with a unique holiday twist. Instead of plain granulated sugar for the topping, we use finely crushed peppermint candy canes. When caramelized with a brulee torch, these candy cane fragments melt and fuse, creating a stunning, toasted stained-glass surface that shatters into a delightful peppermint crunch with every tap. This innovative touch not only adds a beautiful visual element but also an invigorating burst of minty sweetness that perfectly complements the rich, creamy custard.
Crafting Your Perfect Peppermint Creme Brulee: A Step-by-Step Guide
Creating this festive peppermint creme brulee is a surprisingly simple process, making it an ideal choice for busy holiday hosts. The key lies in understanding the basic techniques and paying attention to a few crucial details. With this recipe, you’ll be able to whip up a batch of these exquisite desserts that will undoubtedly become a holiday tradition.
Essential Ingredients for Festive Flavor
The beauty of creme brulee lies in its minimal, high-quality ingredients. For our peppermint version, we’re simply adding a few seasonal twists:
- Heavy cream: The foundation of our luxurious custard, ensuring unparalleled richness and a silky texture.
- Egg yolks: These are crucial for thickening the custard and giving it that classic creamy consistency.
- Granulated sugar: Provides sweetness to the custard and forms the delightful caramelized crust.
- Vanilla extract: A classic pairing with peppermint, vanilla adds depth and a comforting aroma to the dessert. Don’t skip it, as it balances the mint beautifully.
- Peppermint extract: The star of the show! Use a good quality extract for the best flavor without being overpowering.
- Salt: Just a pinch to enhance all the other flavors, bringing out the sweetness and richness.
- Peppermint candy canes (crushed): The secret ingredient for our unique, festive topping. These create a beautiful “stained glass” effect and a satisfying crunch.
- Butter (for dishes): A small amount to grease the ramekins, ensuring your creme brulee releases easily.
Detailed Instructions for a Flawless Dessert
- Preheat and Prepare: Begin by preheating your oven to 325 degrees F (160 degrees C). Lightly butter six 6-ounce ramekins or ten 4-ounce ramekins, depending on your desired serving size. Arrange these prepared ramekins within a large, rimmed baking dish. This setup is crucial for the water bath, which ensures even, gentle cooking and prevents the custard from curdling.
- Craft the Creamy Custard Base: In a medium bowl, vigorously whisk together the egg yolks, granulated sugar, vanilla extract, peppermint extract, and salt until the mixture is pale yellow and slightly thickened. In a separate microwave-safe bowl, heat the heavy cream in the microwave until it reaches a gentle simmer. Be careful not to let it boil over. Now, here’s the critical step: while continuously whisking the egg mixture *feverishly* (meaning quickly and constantly), slowly pour the hot cream into the egg mixture in a thin, steady stream. This process, known as tempering, gradually raises the temperature of the egg yolks, preventing them from scrambling. Continue whisking until the mixture is completely smooth and well combined. Carefully divide the finished custard mixture evenly among your prepared ramekins.
- The Essential Water Bath: Carefully pour hot water around the ramekins in the baking dish. The water should come about halfway up the sides of the ramekins. This water bath (or bain-marie) creates a moist, even heat environment, ensuring the custards bake gently and achieve their signature silky texture without developing a rubbery consistency.
- Bake to Perfection: Gently transfer the baking dish with the ramekins and water bath to the preheated oven. Bake for approximately 35-45 minutes. For smaller 4-ounce ramekins, aim for the shorter end of the baking time (around 35-40 minutes), while larger 6-ounce ramekins will require 40-45 minutes. The creme brulees are done when the edges are set and firm, but the very center still has a slight, delicate jiggle. Overbaking can lead to a less creamy texture. Remove the baking dish from the oven, and carefully lift the ramekins out of the water bath. Allow them to cool completely at room temperature until they are easy to handle. Once cooled, cover the tops of each ramekin with plastic wrap, ensuring the wrap doesn’t touch the custard directly, and chill them in the refrigerator for at least 4 hours, or ideally, overnight. They can be prepared up to a week in advance, making them perfect for holiday meal planning.
- Prepare the Candy Cane Topping: About one hour before you plan to serve, retrieve the chilled custards. Crush the peppermint candy canes into a fine powder using a food processor or a blender. Alternatively, place them in a sturdy Ziploc bag and crush them with a rolling pin. Evenly sprinkle a generous layer of this candy cane powder over the top of each chilled custard.
- The Iconic Brulee & Serve: Using a culinary torch, caramelize the candy cane topping. Move the flame slowly and evenly over the surface until the candy cane powder melts, bubbles, and transforms into a glossy, hardened, “stained-glass” crust. Work quickly but carefully to achieve an even caramelization. Immediately after torching, place the bruleed custards back into the refrigerator for at least twenty minutes to allow the candy cane topping to cool and fully harden. This ensures that satisfying crack when tapped. If you do not have a brulee torch, you can achieve a similar effect under your oven’s broiler. Place the entire tray of ramekins under a preheated, *fiery hot* broiler. Watch them *constantly* – this process takes less than a minute. The moment the candy cane topping melts and caramelizes, remove them to prevent burning.
Tips for Creme Brulee Mastery
Achieving the perfect creme brulee is incredibly rewarding. Here are some extra tips to ensure your peppermint version is a resounding success:
- Quality Extracts Matter: Since peppermint and vanilla are central to the flavor, invest in high-quality pure extracts. Imitation extracts can leave an artificial aftertaste.
- Don’t Rush Tempering: The slow, steady pour of hot cream into egg yolks is crucial. If you pour too quickly or don’t whisk constantly, you’ll end up with scrambled eggs, not a smooth custard.
- The Perfect Jiggle: When removing from the oven, the custard should jiggle like a firm jelly, not a liquid. It will continue to set as it chills.
- Chilling is Non-Negotiable: Adequate chilling time is essential for the custard to fully set and for the flavors to meld. Don’t skip this step!
- Fine Candy Cane Powder: For the best “stained glass” effect, ensure your candy canes are crushed into a fine powder. Larger chunks might not melt evenly.
- Torch Technique: When torching, keep the flame moving. Lingering in one spot can burn the candy cane or the custard beneath. Aim for an even, golden-amber crust.
- Broiler Alternative Caution: If using the broiler, preheat it thoroughly and position the rack so the ramekins are a good distance from the heat source to avoid burning too quickly. And as mentioned, never turn your back on them!
Variations and Serving Suggestions
While this peppermint creme brulee is divine as is, don’t hesitate to experiment! You could:
- Chocolate Drizzle: A light drizzle of melted dark chocolate over the bruleed top adds another layer of decadence.
- Mint Sprigs: Garnish with a fresh mint sprig for an elegant presentation and an extra pop of green.
- Holiday Spice: For a different twist, consider adding a pinch of cinnamon or cardamom to the custard for a warm, spicy note, though this would alter the pure peppermint profile.
- Espresso Kick: A teaspoon of instant espresso powder dissolved in the hot cream can create a mocha-peppermint fusion.
Serve these individual custards on small dessert plates, perhaps with a side of fresh berries or a dollop of whipped cream, though they are truly perfect on their own. The contrasting textures and festive flavor make them a memorable end to any holiday feast.
Explore More Festive Peppermint Treats!
If you adore the invigorating taste of peppermint during the holidays, you’re in for a treat! Discover more delectable recipes that celebrate this iconic flavor:
- Decadent Peppermint Fudge
- Better Than McDonald’s Shamrock Shake (Peppermint Milkshake)
- Irresistible Homemade Peppermint Patties
- Crunchy Peppermint Muddy Buddies
- Delightful Peppermint Frosted Sugar Cookies
- Cozy Candy Cane S’mores
- Elegant Peppermint Crunch Truffles

Print Recipe
Christmas Creme Brulee Recipe
This easy peppermint creme brulee recipe with a candy cane top is the perfect dessert to welcome the holiday spirit!
Ingredients
- 3 1/2 cups heavy cream
- 6 egg yolks
- 1/2 cup granulated sugar
- 1 tablespoon vanilla extract
- 1/2 teaspoon peppermint extract
- Pinch salt
- 5 peppermint candy canes crushed
- Butter for dishes
Instructions
- Preheat the oven to 325 degrees F (160 C). Butter six 6-ounce ramekins or ten 4-ounce ramekins. Place the ramekins in a large rimmed baking dish.
- In a bowl, whisk the egg yolks with the sugar, vanilla, peppermint extract, and salt until light and creamy. In a separate microwave-safe bowl, microwave the heavy cream until it simmers. While whisking the egg mixture continuously, slowly pour the hot cream into the eggs to temper them. Distribute the mixture evenly among the prepared ramekins.
- Carefully pour hot water around the ramekins in the baking dish, filling it about halfway up the sides of the ramekins. Carefully place the dish in the oven.
- Bake for 35-45 minutes (35 minutes for smaller ramekins, 40-45 minutes for larger). The edges should be firm, and the center should jiggle slightly. Remove from the oven, cool until easy to handle, then cover with plastic wrap and chill for at least 4 hours, or up to a week.
- One hour before serving, crush the candy canes into a fine powder using a food processor or blender. Sprinkle the powder generously over the top of each chilled custard.
- Using a brulee torch, caramelize the candy cane topping until it melts into a glossy, hard crust. Alternatively, place the ramekins under a hot broiler for less than a minute, watching constantly to prevent burning. Place them back in the fridge for at least twenty minutes to harden the topping before serving.